CDC Blue Wing Olive – 03/11/2014

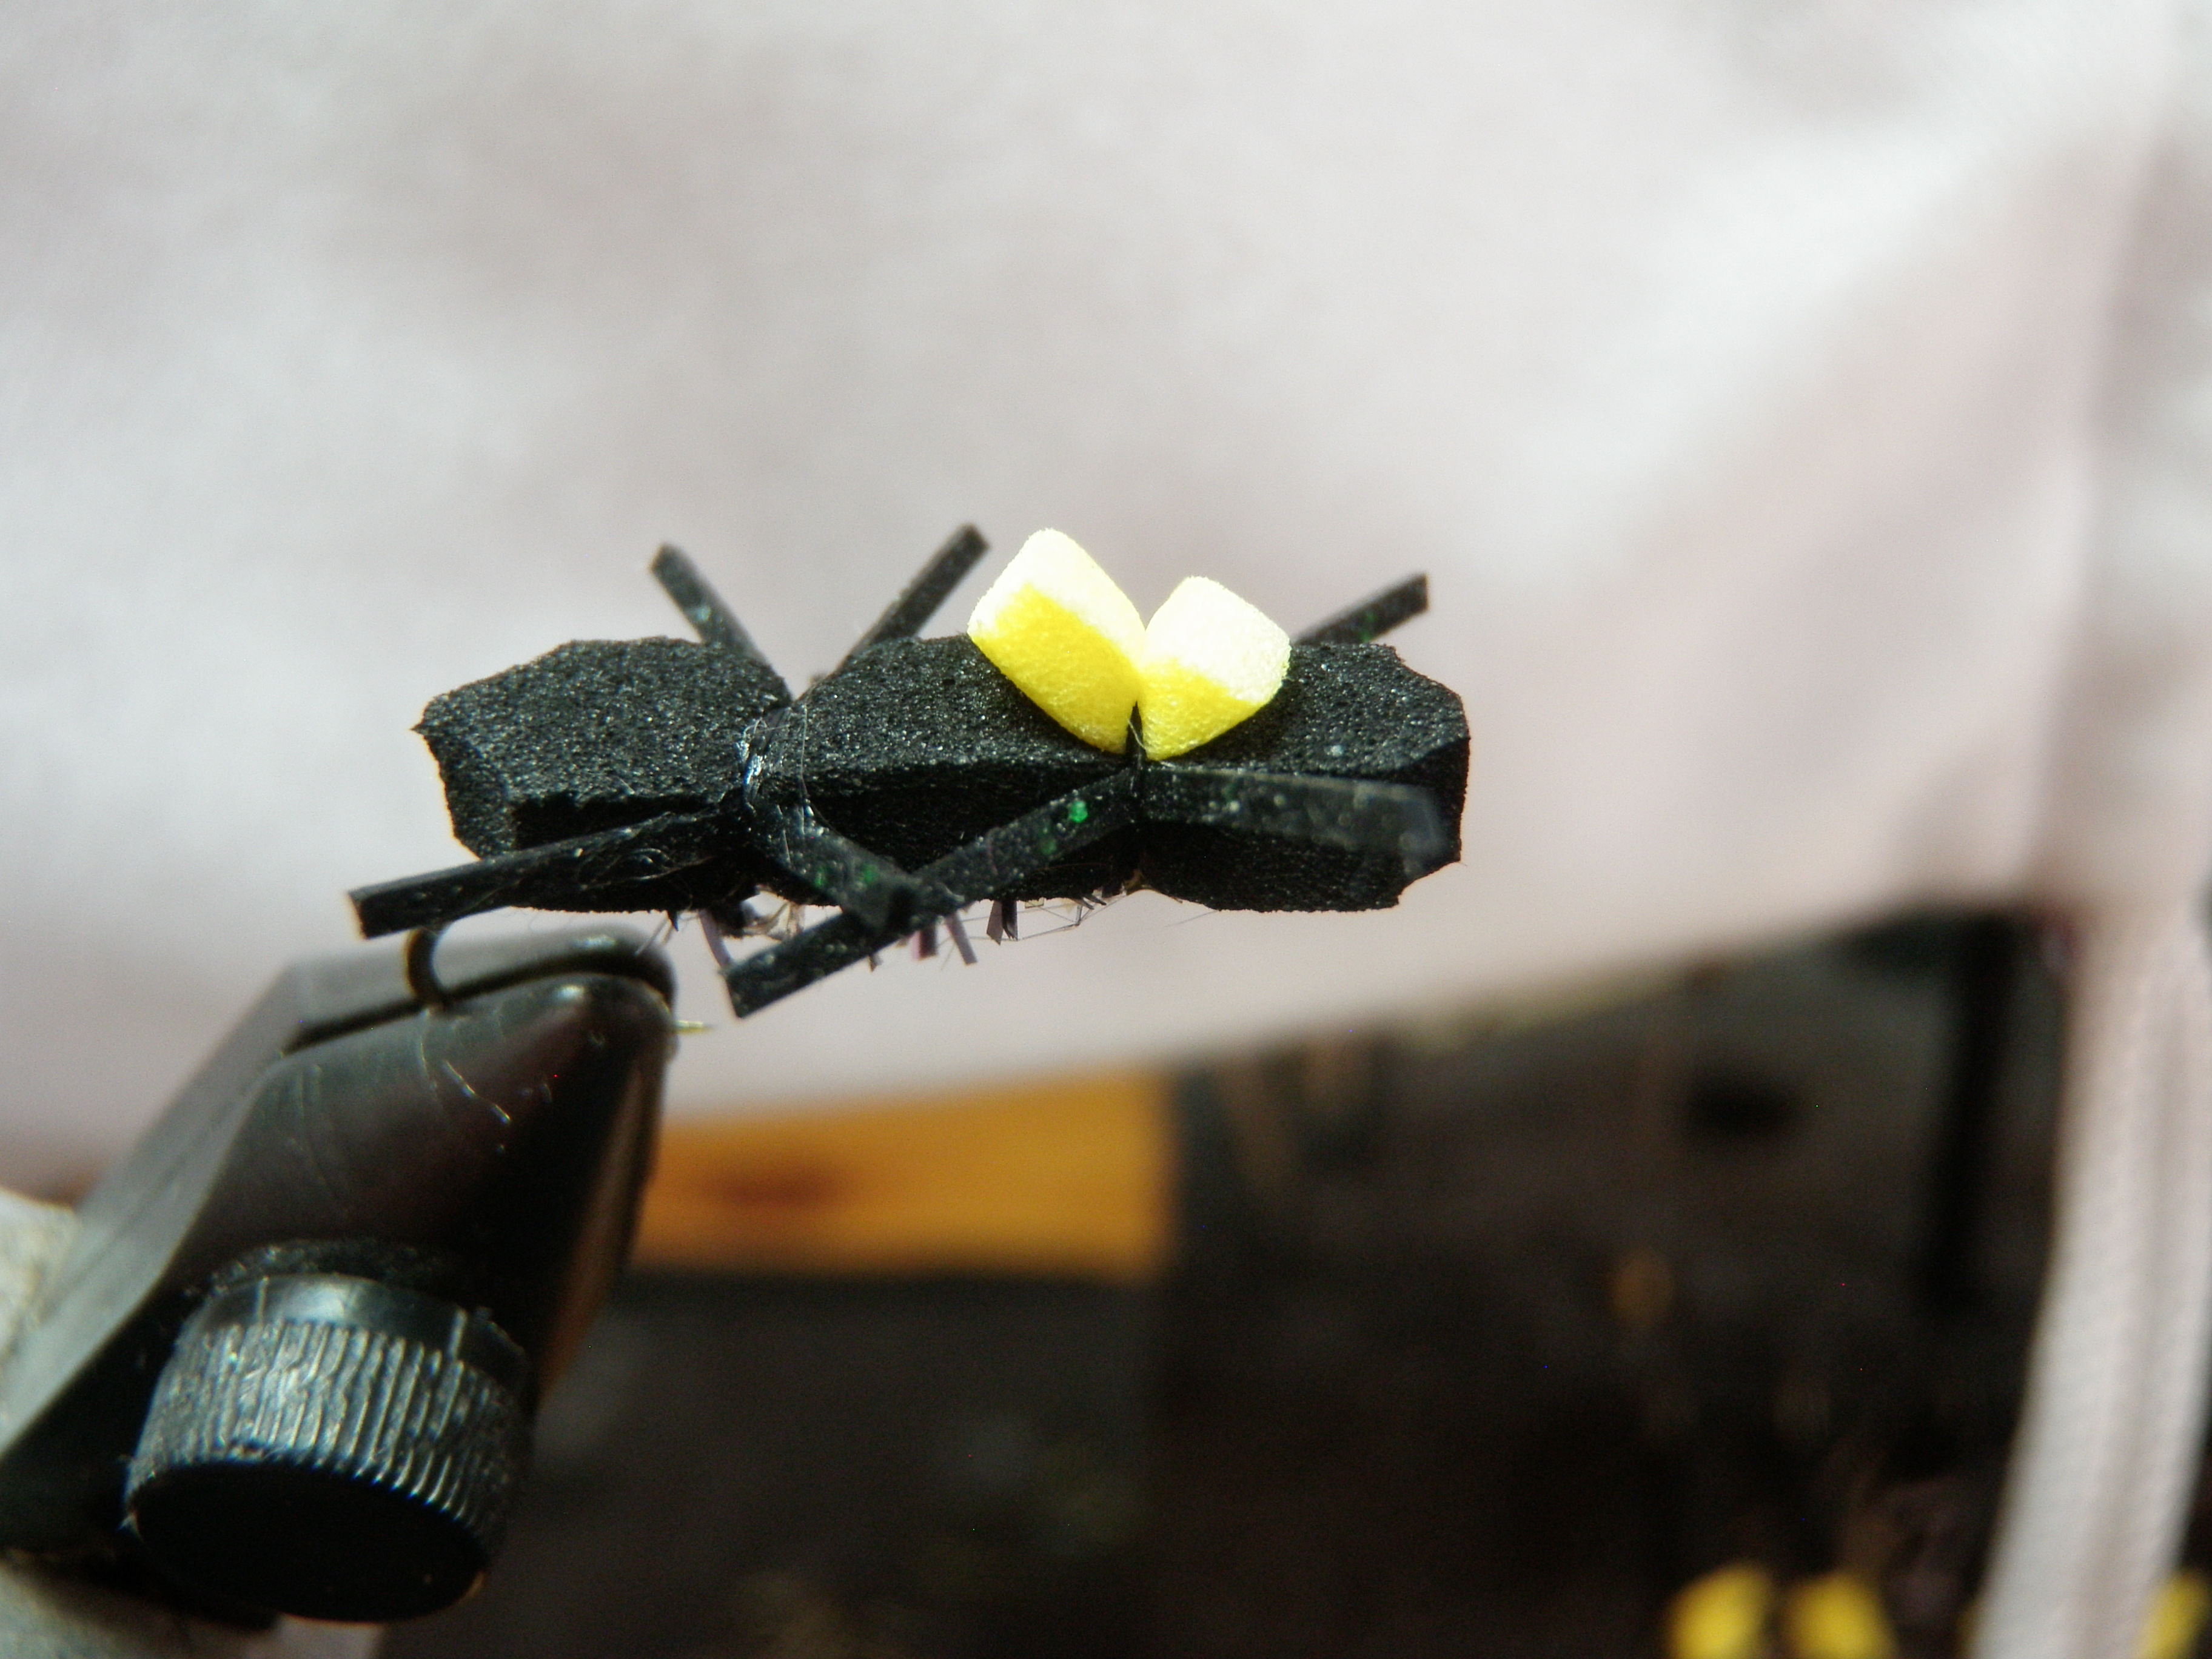
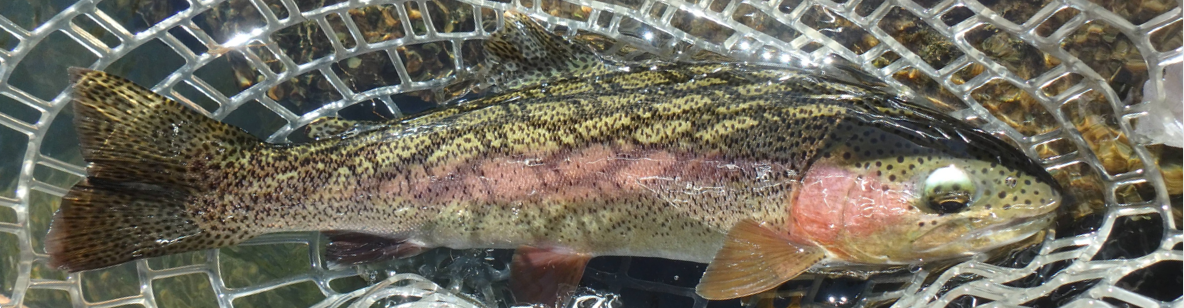
CDC Blue Wing Olive 03/11/2014 Photo Album

I can remember numerous frustrating outings on the South Platte River during fairly dense blue wing olive hatches when I was unable to catch a single fish. At the time I was probably using a parachute adams or a small comparadun. The comparadun served me well in larger sizes, but it was next to impossible to produce a size 20 or smaller imitation with a slender body due to the density of the deer hair wing.

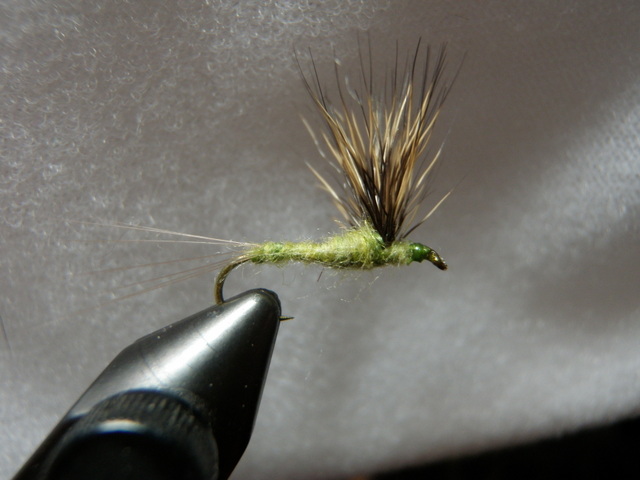
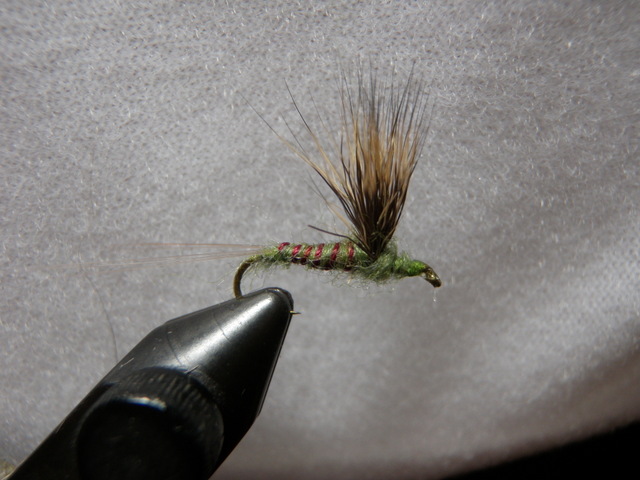
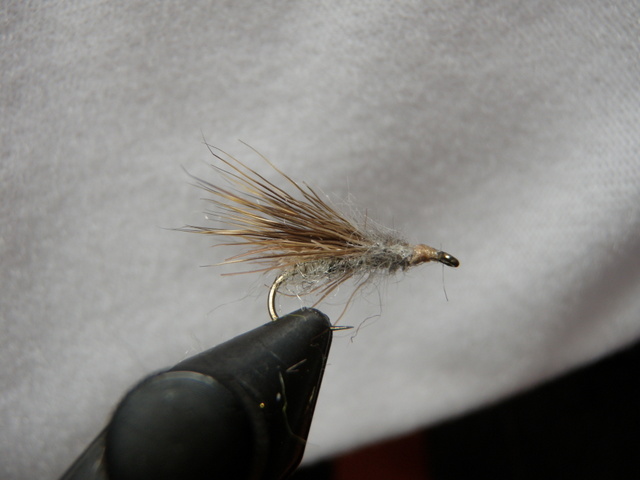
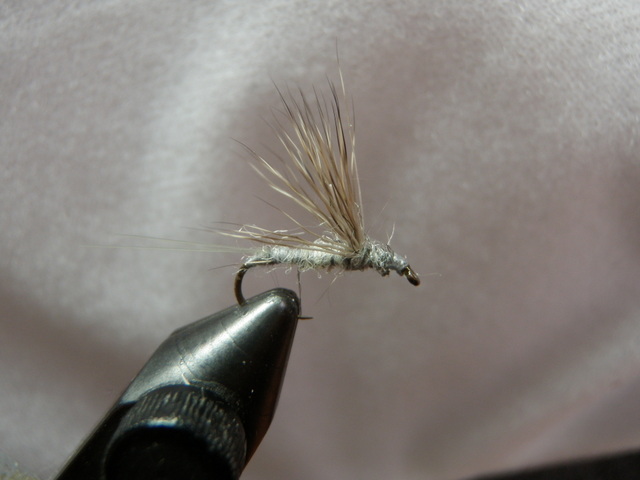
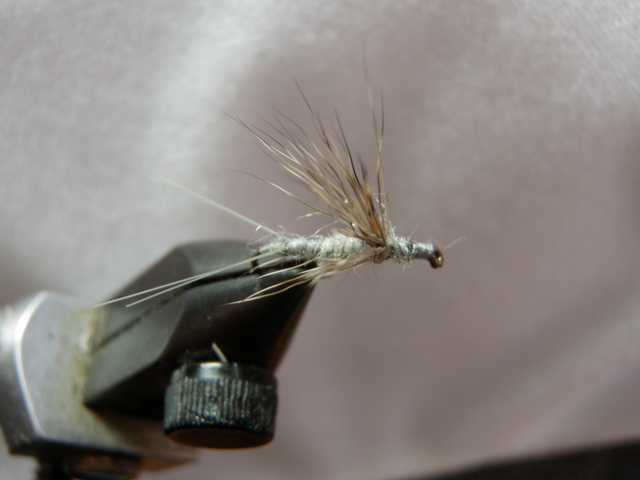
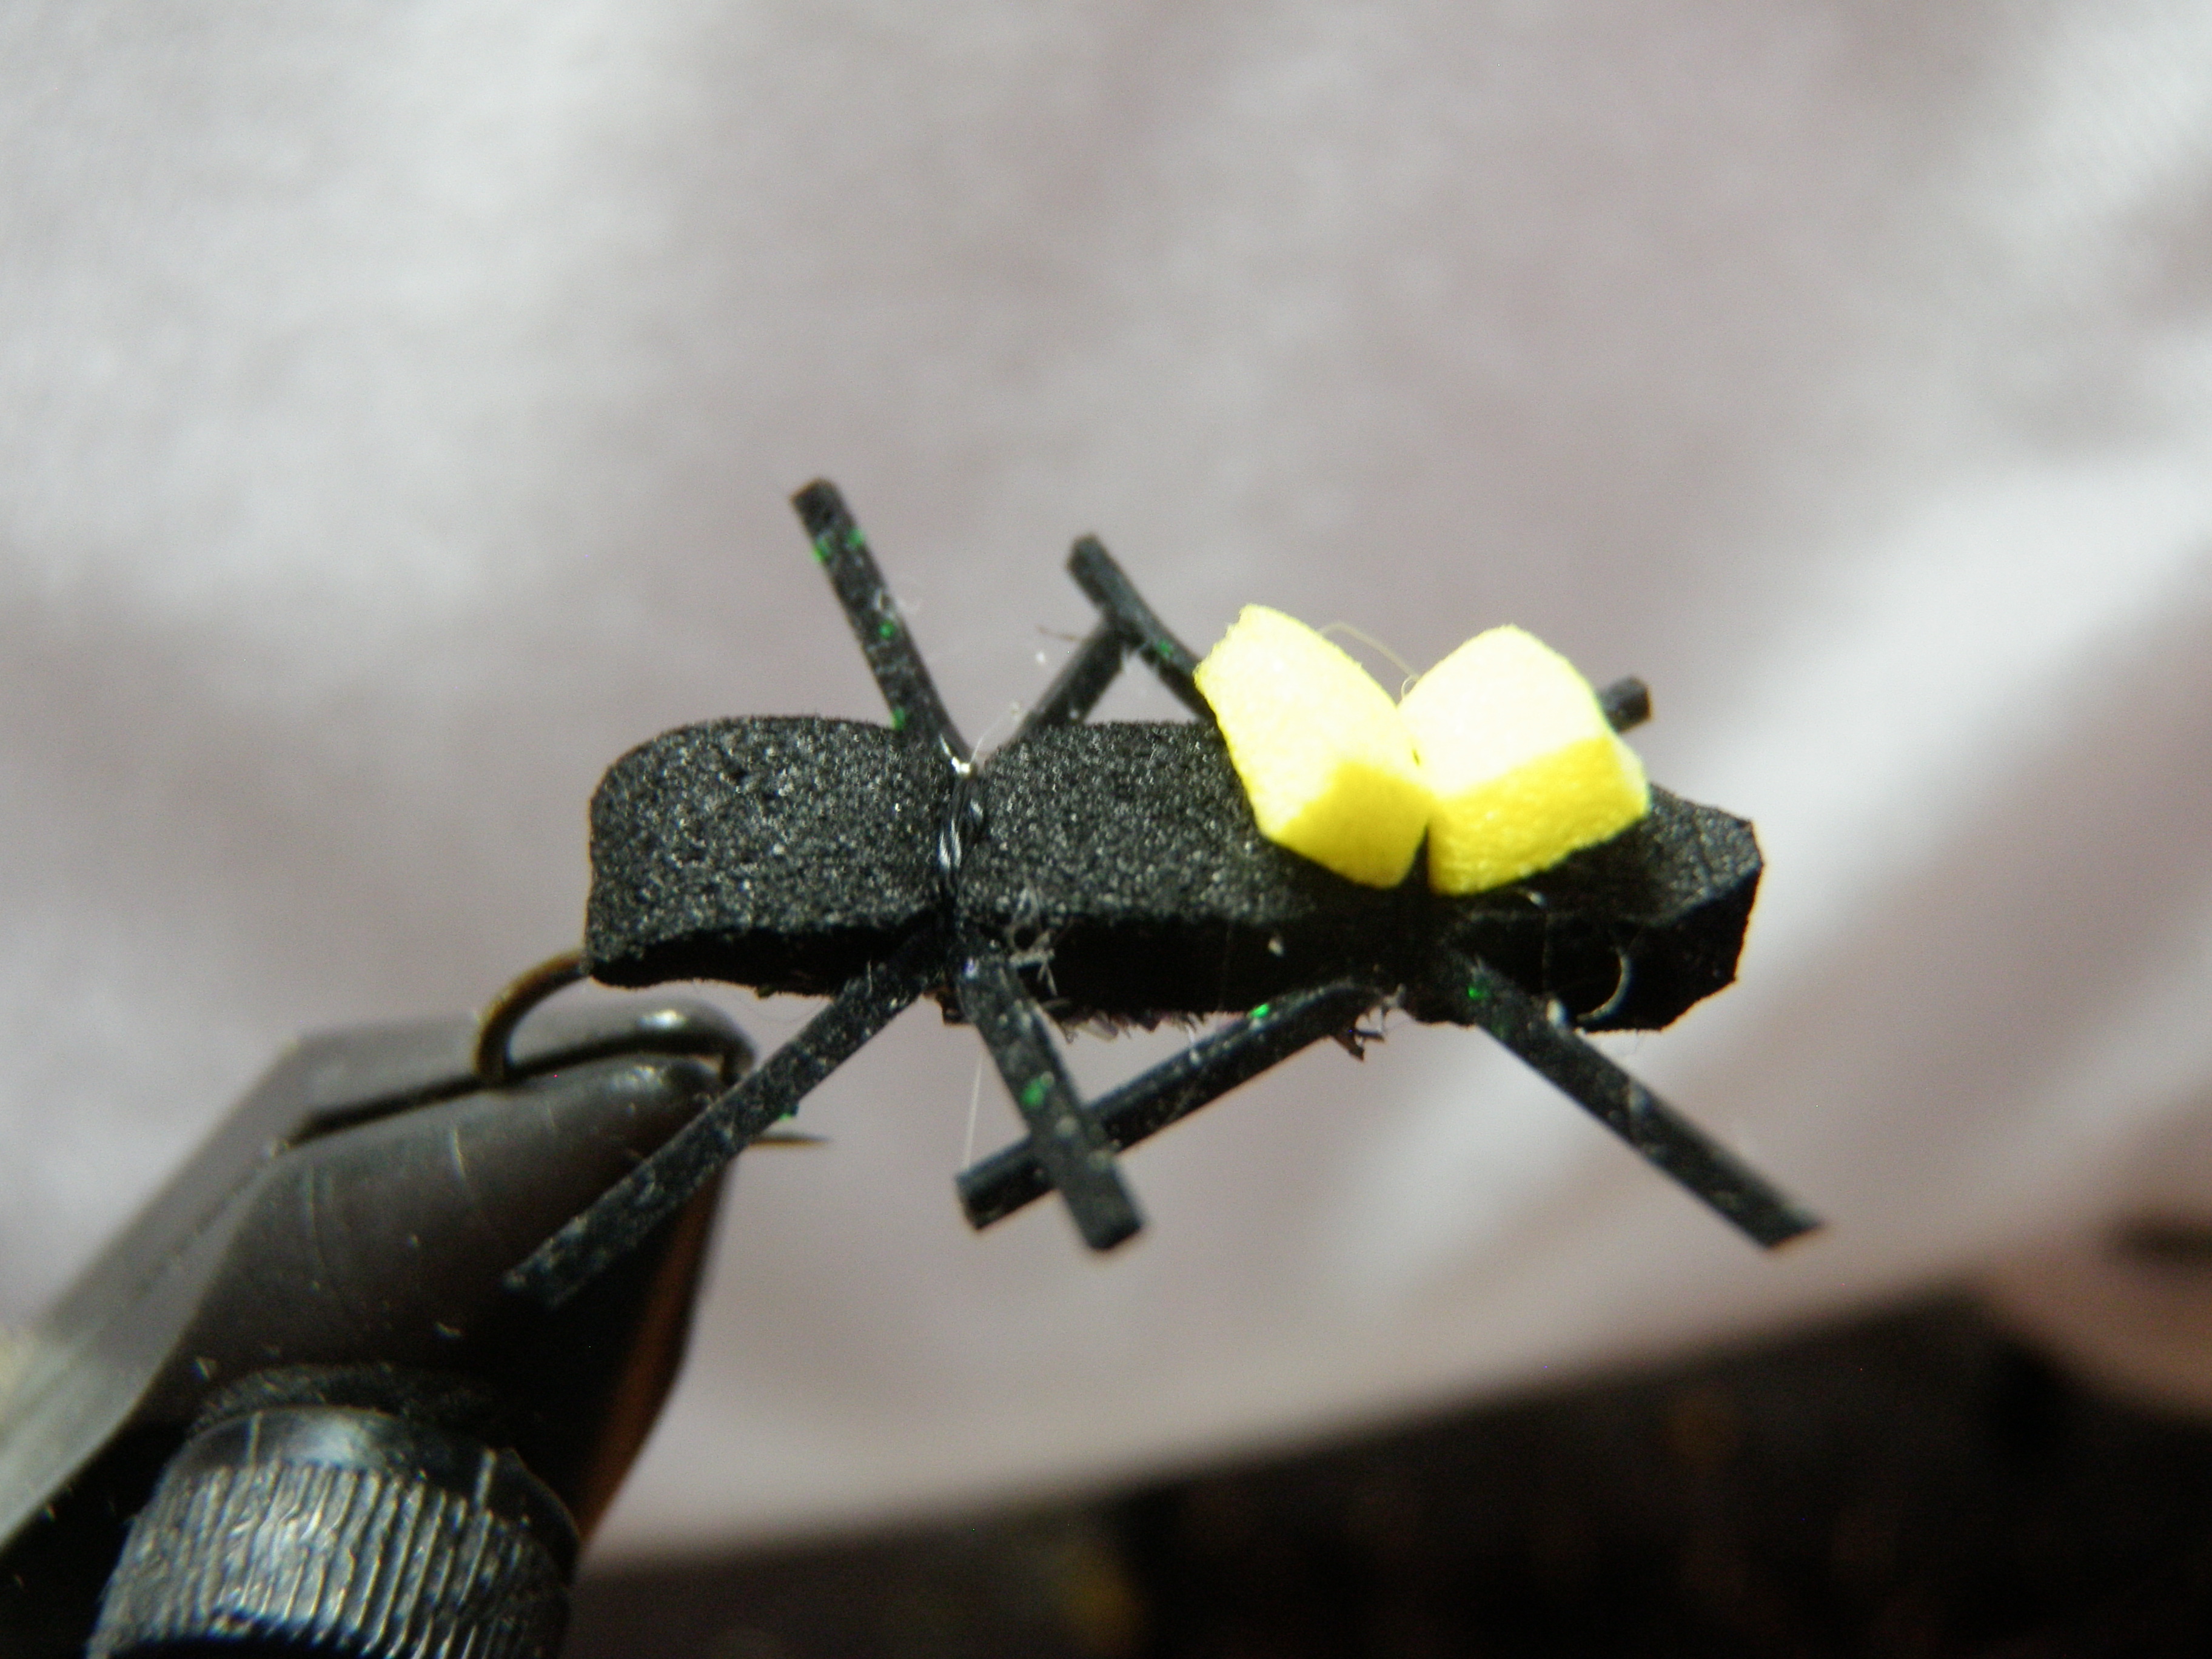
This frustration caused me to evaluate other wing materials, and when I read about CDC and its water repellent qualities, I decided to try using it as a replacement for deer hair. CDC is very light and compresses well at the tie in point to enable a slender body, yet it looks fluffy and bulkier when dry for a visible wing. In addition its water repellent qualities allow it to help float the body of the fly, and the sihouette of the fly remains in line with the comparadun style.
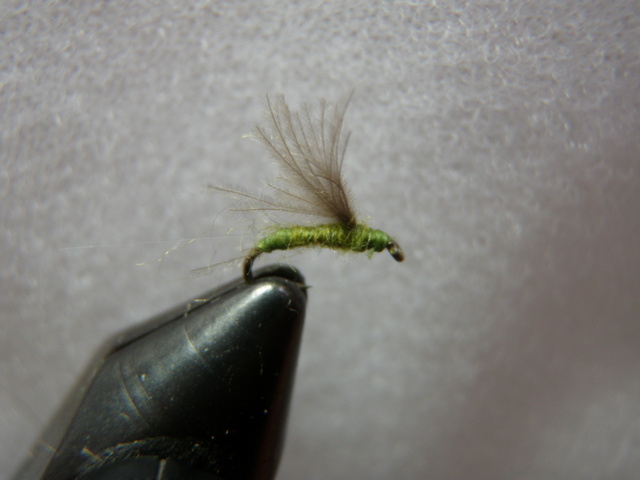
Enlarged Side View

Enlarged Side View

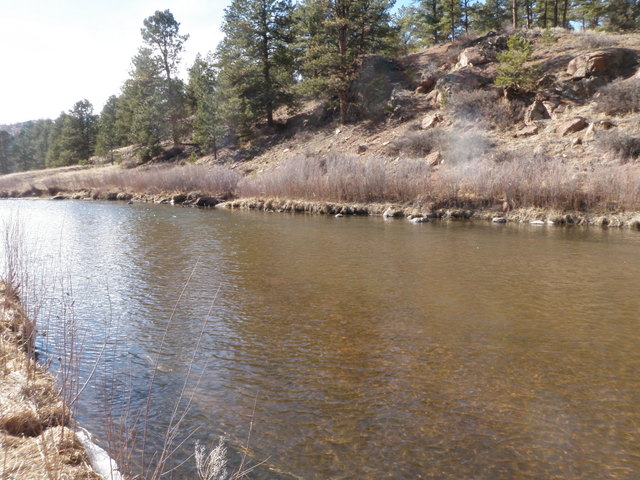
I tied some one winter, and the first memorable success with these flies occurred on the Williams Fork tailwater above its junction with the Colorado River. A friend and I chanced upon a very dense blue wing olive hatch during August late in the afternoon, and I pulled a CDC olive from my fly box and tied it to my 5X tippet. This fly produced some sensational results over a two hour period in a large pool on the Williams Fork, and ever since then it has become a mainstay in my flybox. My partner during this outing was using a parachute style BWO, and his results did not come close to the success that I enjoyed. I’ve enjoyed numerous additional successful experiences using the CDC olive during intense BWO hatches on the Frying Pan River, Colorado River, South Platte River, Arkansas River and Big Thompson River.

The only downside to the CDC blue wing olive is the difficulty encountered in refreshing the wing after catching a fish. Once the CDC wing gets wet it has a limp narrow profile so I typically dip the fly in dry shake several times, blow on it, and continually fluff it with my finger until it gets back to a reasonable wing appearance. If it is raining as is often the case during a strong BWO hatch, the task of drying the wing becomes even more problematic. I put up with this extra effort and the extended fluff time because the fly is so effective.
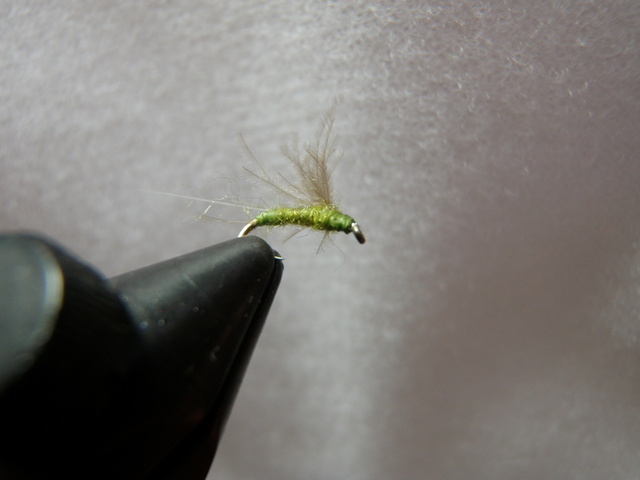
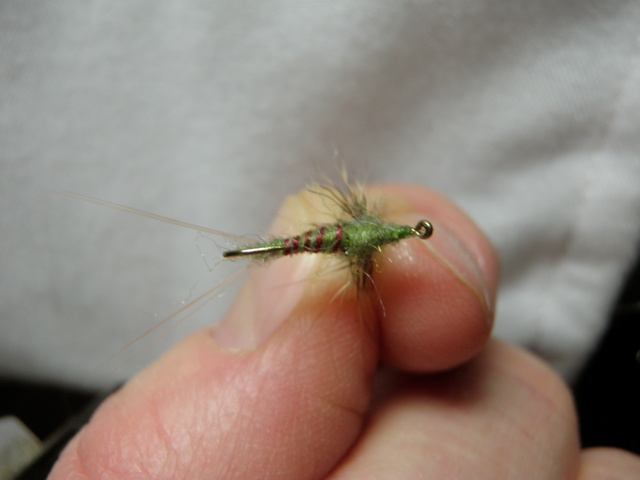
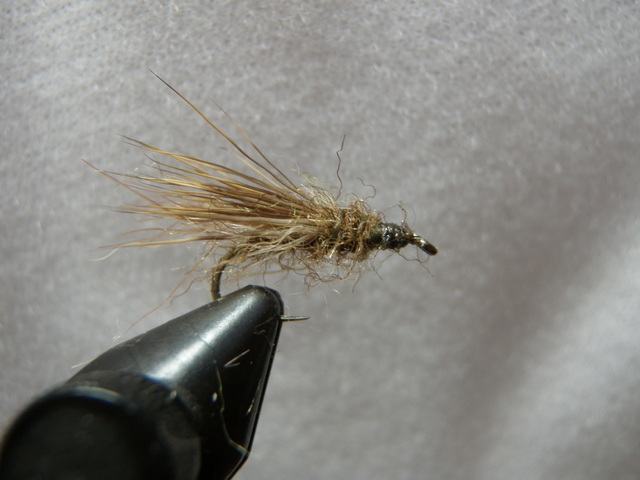
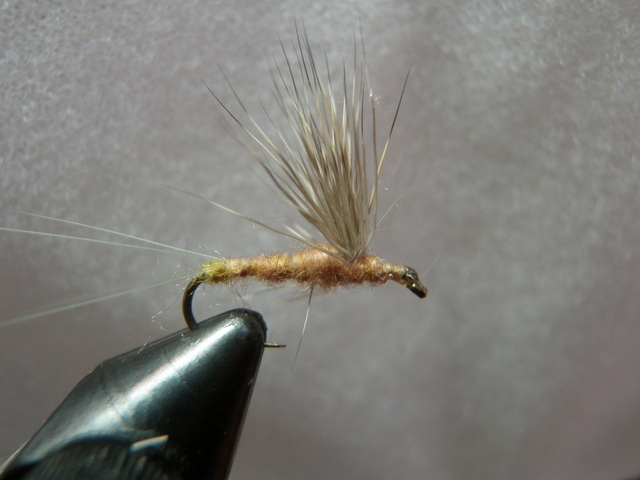
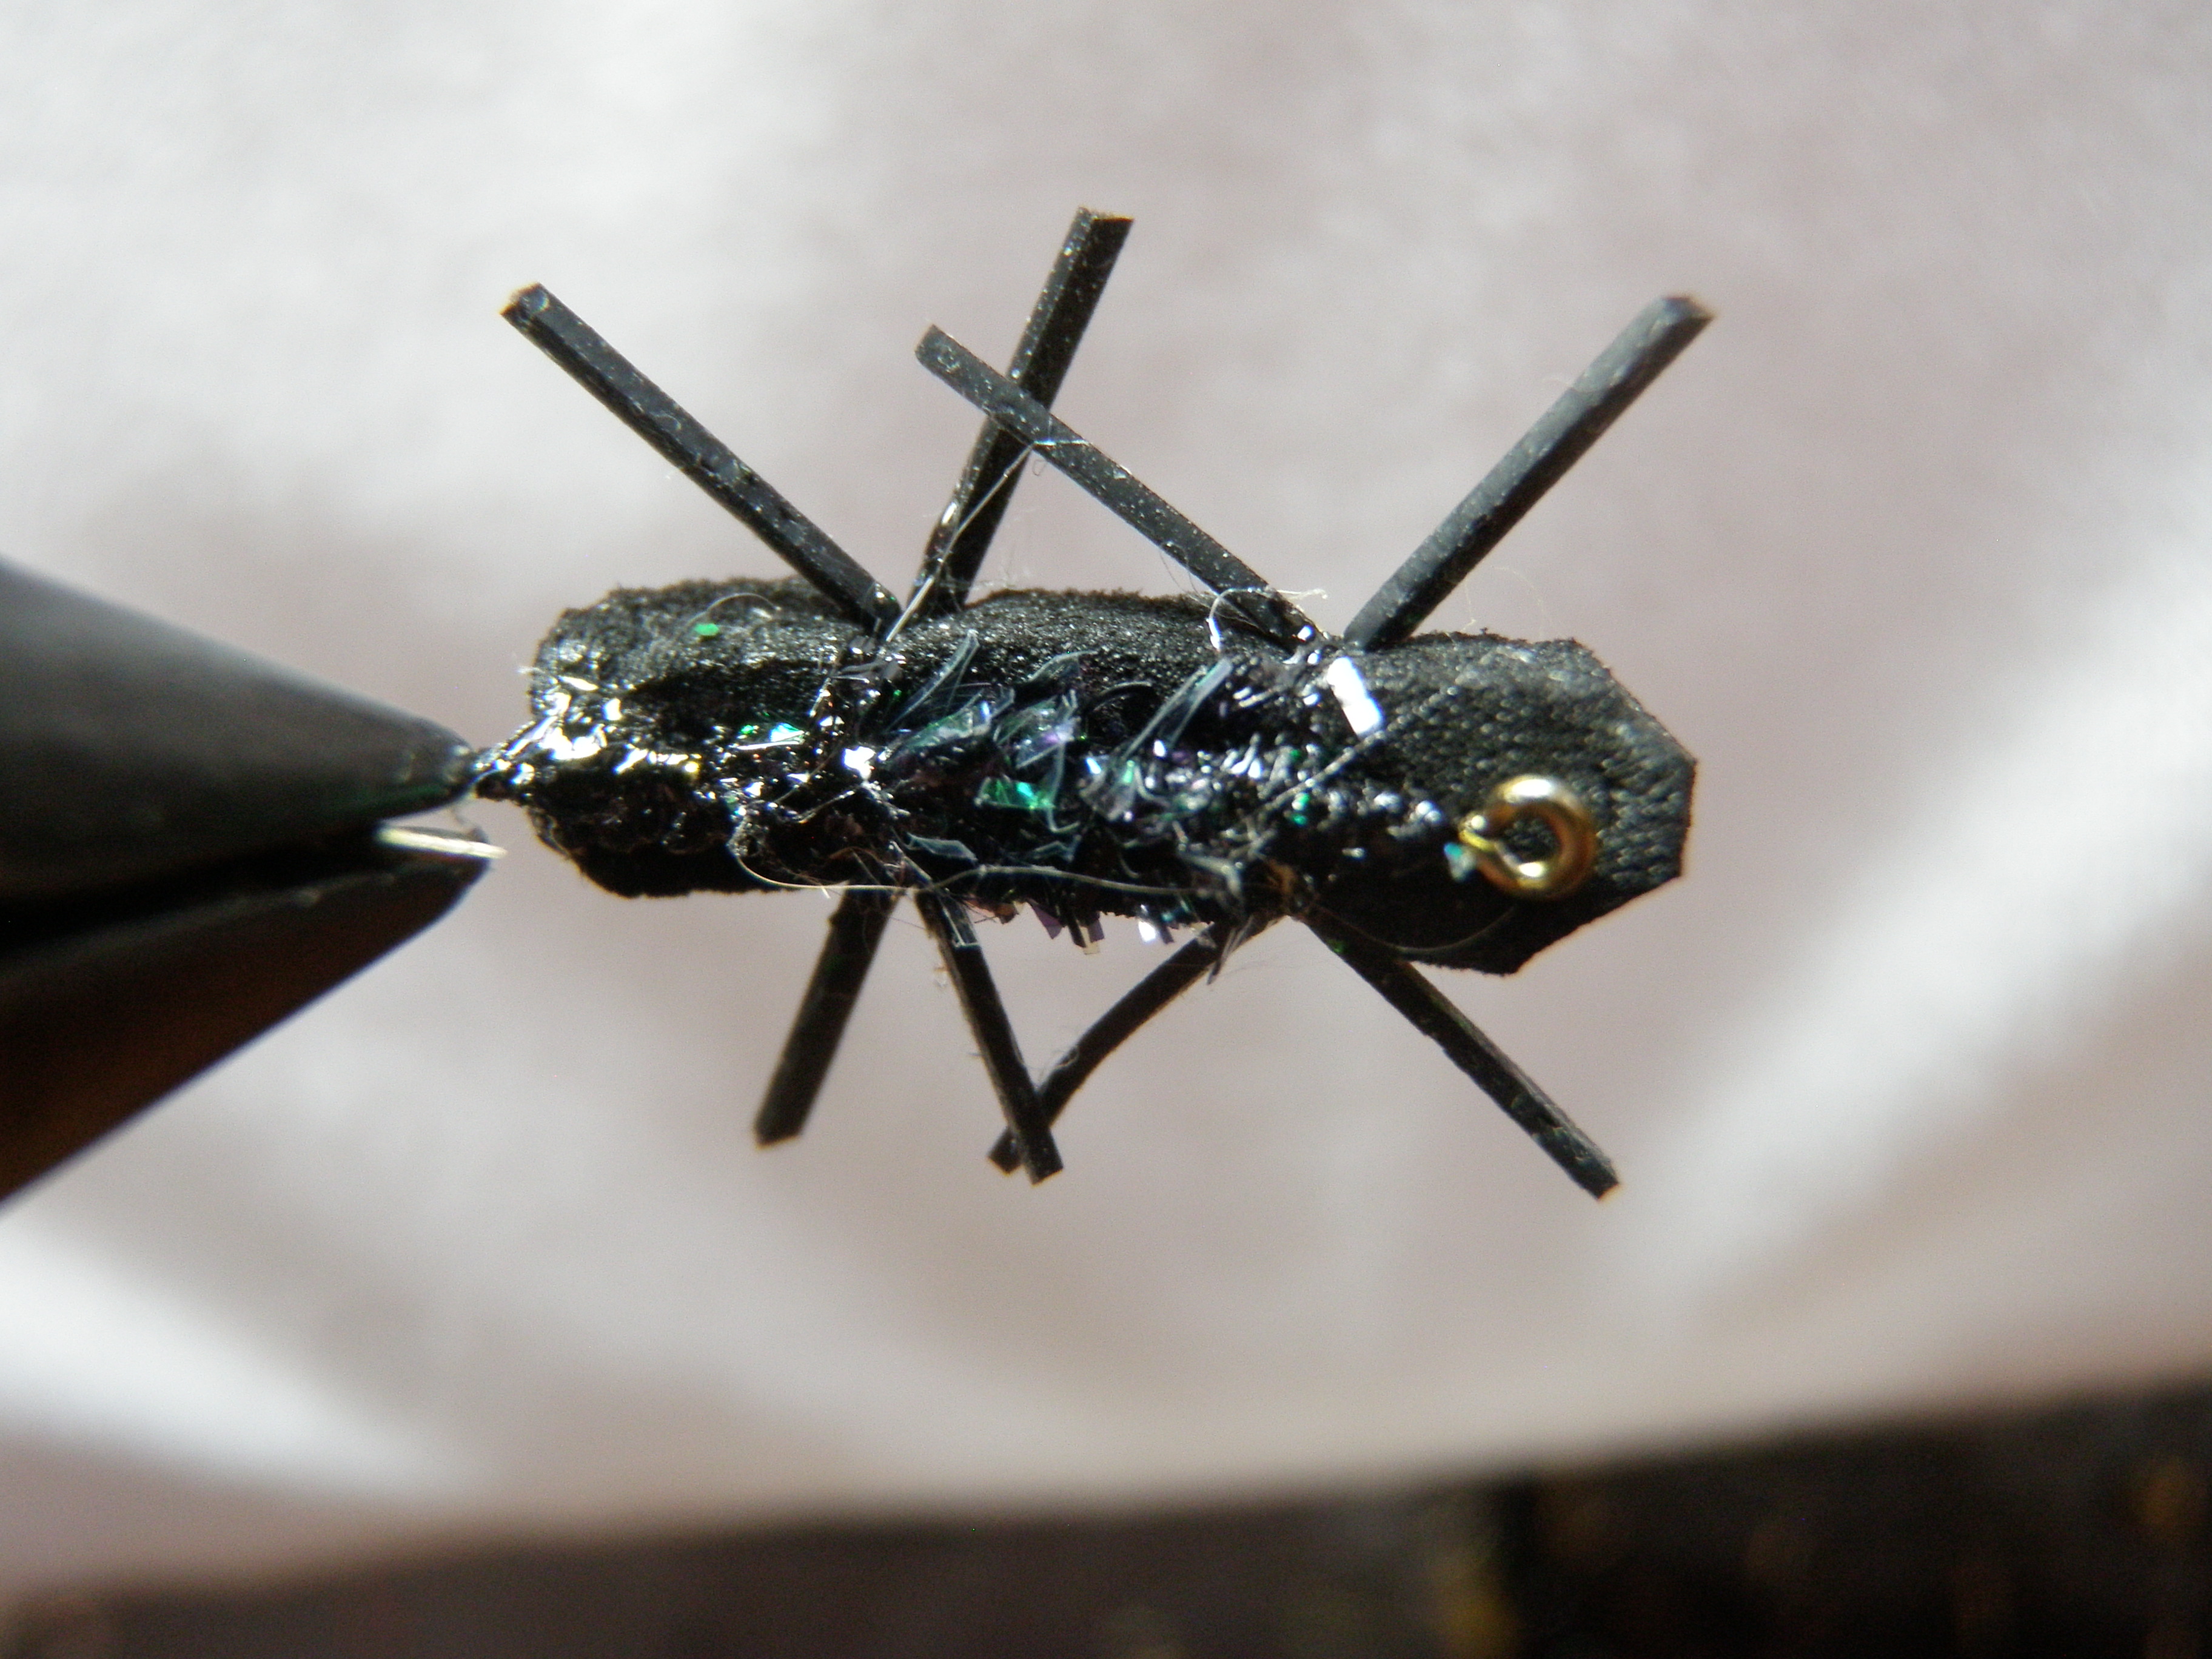
From Underneath

From Underneath

I’ve recently considered substituting snowshow rabbit foot hair for the CDC in a comparadun style BWO imitation. Now that I’ve worked with snowshoe rabbit hair in the muggly caddis, I recognize that it might be a nice compromise between deer hair and CDC in terms of being lighter and able to compress to minimize body bulk, while at the same time presenting a stiffer wing that can be dried faster after being submerged.

For now I tied 10-15 additional CDC blue wing olives in two different shades of light olive for the upcoming season. One olive carries a more yellowish hue, while the other is more green on the color scale. Hopefully I’ll experience some strong BWO hatches soon on the Arkansas River so I can verify the effectiveness of my recent tying efforts, and maybe I can find some time at the vice to make a few snowshoe olive prototypes to test.

Arapahoe Basin – 03/05/2014

Arapahoe Basin 03/05/2014 Photo Album

Arapahoe Basin touts itself as the legend. I’m not sure it’s a legend, but it surely has an aura and feel of ruggedness that hard core outdoor enthusiasts appreciate. A-Basin is certainly not attempting to appeal to the cushy tourist crowd that the large ski areas compete to attract. Nestled in a high country basin three-fourths of the way up Loveland Pass, A-Basin’s high elevation bowls showcase steep terrain and numerous cornices for the fearless leaping skiers. There is an intimacy about this place that harkens back to small family-owned ski areas that flourshed before the ski industry went corporate. The free “beach” parking, the rustic base lodge, and the reasonable food prices are extras that increase my enjoyment of a day of skiing at the legend.

Great View of A-Basin and Loveland Pass Road

Great View of A-Basin and Loveland Pass Road

I contacted my regular ski buddies to see if anyone was available for a day in the high country on Wednesday, March 5. The only available taker was Fred Young, so I agreed to stop at his mountain house near Dillon by 8AM, and we tentatively planned to go to Breckenridge from there. Unfortunately Denver received three or four inches of snow Tuesday night into Wednesday morning, so the drive was a challenge, particularly the stretch from western Denver to Idaho Springs and then from Silver Plume to Silverthorne. Fred was waiting in his garage when I arrived ten minutes late due to the slow going, and we quickly assessed the options and decided to change our destination to Arapahoe Basin.

I had not yet skied at A-Basin in 2014, so I was open to making it my ski playground for the day, and Fred stated that Breckenridge and A-Basin both received approximately three inches of new snow. Fred’s wife Douggie had ski lessons at A-Basin on her schedule, but we departed ahead of her in my SUV to obtain prime beach parking next to the slopes. It worked out, and I backed into a nice spot seven spaces west of the picnic tables by 8:25. We prepared to ski, but neither the Mountain Express nor the Pallavicini lifts were showing any signs of movement. Eventually Fred asked a lift operator at the short beginner chair across from us and learned that the main lifts didn’t open until 9AM on weekdays.

Fred Glides Off Montezuma Bowl Cornice

Fred Glides Off Montezuma Bowl Cornice

A large gray cloud hovered over the mountain as we finally boarded the Pallavicini lift and made the quick ride to the top. The cloud cover remained and compromised the lighting for most of the morning, however, we still managed to ski International, Radical, Standard, and Slalom Slopes. These were all moguled black diamonds, and the fresh snow combined with poor lighting made recognizing the variations in terrain very difficult.

Finally by 11AM some periods of sun broke through so Fred and I did a couple double black diamond runs on Montezuma Bowl. These were a blast as we accepted the challege of dropping off the ten foot high cornice and then jump turning our way down the steep face. We returned to the front side for a maiden run down the skier right side of Pallavicini and ended our morning with a couple runs off the Lenawee lift and then retreated to the base lodge for lunch by 11:30 or 12:00.

After lunch we attacked Pallavicini for a second time although we stayed to the left of Spine, the higher backbone that runs down the center. Next we dazzled the ski lift riders on International and then ended our day with a sprint down West Wall and then took the Lenawee chair to the summit to position ourselves for a traverse and descent of East Wall.

Fred Below in Pallavicini Chute

Fred Below in Pallavicini Chute

It was a fun day of skiing nearly 100% black diamond terrain, and I was both exhilierated and exhausted by 2:30 when we called it a day. We met Douggie, and she agreed to accept her husband as a passenger, so we transferred Fred’s gear, and then I made my return trip to Denver over Loveland Pass

I’ve always been an admirer of simple elegance, and A-Basin certainly fits that description. Pure and simple beauty and elegance combine with rugged above-timberline terrain to create a legend.


Green Drake 2014 – 03/04/2014

Green Drake 2014 03/04/2014 Photo Album

When I last reported on green drake imitations in 2013, I felt I solved my poor flotation problem of comparadun green drakes by tying some attractive parachute flies in size 14 and 12. I constructed these flies with more moose mane fibers for the tail and a parachute hackle to assist in flotation. Unfortunately the puzzle is never completely solved in fly fishing.

Early in the season I experienced some fine results using my new parachute green drakes on the Big Thompson River and also during my first trip to the Frying Pan River. Unfortunately as the season progressed, and I made two subsequent trips to the Frying Pan River, I discovered that the paradrake was not the total answer. I encountered several significant hatches where the old comparaduns outperformed the parachute style fly, and in one instance achieved some success with a parachute fly purchased from Taylor Creek Fly Shop.

Another Side View

Another Side View

I’ve now come to believe that the green drakes that appear late in the season are drunella flavilinea, and these are smaller and best imitated with a size 14 fly with a more slender body than that of the larger size 12 early season green drakes. I’m guessing this explains why my parachute green drakes worked well during my first visit in mid-August, but the same flies proved too large during my September days on the Frying Pan River.

A New Green Drake Comparadun

A New Green Drake Comparadun

With this hypothesis in mind, I returned to my vise and produced some new green drake comparaduns. In order to address the flotation issue, I tied them with six microfibbets split in a wide V for the tail thus providing large outriggers to support the fly. Because I had some success with a purchased parachute green drake with a light olive body exhibiting more of a yellow tinge, I made five with a similar dubbing. I also covered my bases by tying five with my previously favored light olive and maroon thread rib. Finally I refurbished five carry over comparadun style flies by carefully adding more microfibbet tails for better support. These were flies that did not float well when presented two summers ago thus leading to the parachute green drake experiment.

Underside

Underside

I now believe I have numerous options that will serve my needs depending on the size of the green drakes and coloration of the body. The challenge will be to observe and identify what is transpiring on the water and to select the correct option for the situation.

Vail – 02/28/2014

Vail 02/28/2014 Photo Album

Skiing with a group of friends is a lot of fun, and Friday was one of those days. A group of eleven gathered at Vail and enjoyed some fine weather and fresh snow while renewing friendships. The most difficult aspect of the day was trying to keep a group of eleven together, and we did not succeed, but it was a great time nonetheless.

Our friends, the Gaiges, hosted their daughter Jacy and boyfriend Billy for a short winter break as they flew to Denver from Washington DC on Wednesday. The Gaige family joined our other friends, the Youngs, at their rental house near Dillon, and their son Brady and wife Kara joined the group on Thursday night. Jane and I drove to Frisco on Friday morning where we met the rest of the group, and then we car pooled from Frisco to Vail.

Unfortunately when we arrived at the Lionshead parking lot at Vail by 8:45AM, we learned that the Born Free express chair was not functioning so there was a one hour wait in the gondola line. We elected to board a shuttle bus and transferred to Vail Village where we found the line for the Vista Bahn gondola shorter than the lift lines at Lionshead. We were finally able to launch our ski day by 10AM.

The Gang Minus Karen and David Gaige

The Gang Minus Karen and David Gaige

It was well worth the wait as the clouds burned away, and we experienced sunny skies and temperatures in the low 30’s most of the day. The four inches of fresh snow was mostly chopped up by the time we touched down in Game Creek Bowl, but we still managed to find some nearly trackless powder. Even the slopes that were tracked out held nice light snow, so while not fresh untracked powder, the snow conditions were still quite conducive to soft turns and controlling speed on moguls.

Jane on Genghis Khan

Jane on Genghis Khan

A Look at Blue Sky and Lovers Leap

A Look at Blue Sky and Lovers Leap

Perhaps the highlight of the day was our apres ski stop at Q4U, a “hole in the wall” barbecue joint on Summit Avenue in Frisco. Our group met there after an active day of skiing and enjoyed two pitchers of beer and fine barbecued meats. It was a great way to begin a weekend in February.

Top of Little Ollie

Top of Little Ollie

Muggly Caddis – 02/27/2014

Muggly Caddis 02/27/2014 Photo Album

Last winter after completing my production tying of tried and true patterns that have earned a permanent place in my fly box, I decided to experiment with some new patterns. I paged through magazine articles and several of my fly tying books for patterns that caught my eye. As I flipped thorugh Charlie’s Fly Box, I spotted the muggly caddis. This fly appealed to me because it had a very shaggy buggy look and used snowshoe rabbit foot hair as an underwing. I’d read articles about snowshoe rabbit foot hair, and my friend Jeff in Pennsylvania had mentioned that he experimented with it.  The hair possesses natural oils that repel water, so I was intrigued to use this material in a dry fly.

The other interesting thing about this fly is it is tied to look used. Charlie Craven provides an explanation for this with a story in his book before describing the tying steps; but in short another fisherman was outfishing him, and Charlie asked to see his fly, and it was mangled and chewed up to the point that it barely looked like an insect.

I bought a pair of snowshoe rabbit feet and tied 10 or 15 muggly caddis with tan and olive bodies in sizes 14 and 16. They looked great, or perhaps it is better to say they looked shaggy and used, and I tested them on several occasions during 2013 with some positive results. In addition the snowshoe rabbit feet brought me an inordinate amount of good luck in 2013. Actually I did have a reasonably good year in 2013, but I’m hesitant to attribute it to the good luck charm of a rabbit’s foot.

A Gray Muggly Caddis

A Gray Muggly Caddis

For 2014 I decided to augment my supply of muggly caddis by tying five more to bring my total inventory to 20; however, I got carried away and made five with a light gray body and then five more with an olive brown hares ear body. These are the two body colors I use the most when prospecting with caddis to match the local insects.

Olive Brown Muggly Caddis

Olive Brown Muggly Caddis

Once I’d completed the 10 muggly caddis, I thought of the idea to create some muggly sallies to imitate yellow sally stoneflies. I always seem to be short of these flies, and a quick scan of my box indicated that I only had 5-10 in my backlog, so I churned out five yellow muggly sallies. The yellow versions were tied in size 16, and they look very similar to the deer hair yellow sallies I normally tie minus the hackle. Hopefully the fish like them as well, and the snowshoe rabbit hair makes them float well. The fish will be the ultimate judge of the muggly sally.

Muggly Yellow Sally

Muggly Yellow Sally

Breckenridge – 02/20/2014

Breckenridge 02/20/2014 Photo Album

It is hard to imagine that being at a ski area in Colorado on a weekday in February could be anything other than an outrageously fun experience, but I’m going to persuade you otherwise. After spending three great days on the slopes of Beaver Creek the previous week, I was excited to get back to the mountains to hopefully repeat the experience. My friend, John Broadbent, called to let me know he was in Denver the week of February 17, so we made plans to ski on Thursday February 20. Jane had tennis on Tuesday and Wednesday night, so Thursday was the only day when she could be included for a day of skiing.

Once we settled on Thursday as our day, I contacted Fred Young and David Gaige to see if they wished to join us. Fred replied almost immediately that he and his wife Douggie were in, and David Gaige replied a bit later that he and wife Karen would like to join as well. The plan was set. Jane and I would pick up John at his downtown condo and then drive to the Woolly Mammoth parking lot to meet Dave and Karen. We would car pool from there to Breckenridge and meet the Youngs at the Peak 8 base lodge at 9AM.

Unfortunately at the last minute an important project came up at work for Jane, so she was forced to withdraw from the weekday ski adventure, and she was rather upset about the sacrifice. Everything else, however, played out pretty much according to plan; and John, Dave, Karen and I arrived at the Peak 8 base by 9AM. Fred and Douggie called to say they were running late so we changed the meeting time to 9:30 and decided to take one warm up run from the Colorado chair.

John on Rounder's

John on Rounder’s

The roundtrip of riding up the Colorado chair and then skiing down Springmeier proved to be one of the most challenging ski runs of my life. The air temperature was just above 0 and it was snowing lightly with 20 MPH winds whipping across the mountain. I had on my toe warmers and pulled my hood up over my helmet and turned my face away from the wind, but the small amount of exposed flesh on my face felt like it was being stabbed with a thousand pins. Meanwhile my hands were already aching and beginning to turn numb despite having liner gloves nested inside my mittens. As I skied downward I could feel cold air blowing through my coat, and it is rare that my core is cold.

Fortunately we arranged to meet the Youngs inside the lodge, and that gave me an excuse to use the bathroom and warm my hands under the hand dryer, and once I met up with the group again I borrowed some handwarmers from Dave Gaige. Meanwhile there was a huge line extending from the coffee bar and an equally long queue approaching the small ski shop in the corner of the lodge. I suspect Breckenridge did a brisk business in hand warmers, toe warmers, balaclavas, mittens and hats on the day.

I’d like to report that the conditions improved, but that was not the case. The wind and snow and cold continued unabated until around 2:30 in the afternoon. I somehow managed to make five or six runs before lunch, but as I strode into Vista Haus my feet felt like stumps despite the advantage of toe warmers inside my boots. After lunch we remained on Peak 8 and did another three or four runs before John and I agreed to head back into the lodge and warm up. We found a spot at one of the tables and warmed our bodies while waiting for the Gaiges and Youngs to get their fill of skiing in Arctic conditions.

John and Fred Near Bottom of Peak 8

John and Fred Near Bottom of Peak 8

The highlight of the entire day was stopping at The Lost Cajun in Frisco for an apres ski snack. One of our servers draped a necklace of beads around our necks to celebrate Mardi Gras, and then we enjoyed Louisiana beers, seafood gumbo, and tasty beignets for dessert. I could have spent my entire day in the restaurant and skipped the skiing.


Comparaduns – 02/21/2014

Comparaduns 02/21/2014 Photo Album

Every time I type the word comparadun, my spell checker goes crazy. What in the world is a comparadun?

When I began fly fishing in the 1980’s in Pennsylvania all the classic dry flies were created in the Catskill tying style. Nearly all mayflies were imitated with a fly consisting of a dry fly hook (Mustad 94840), fibers from a rooster neck hackle for a tail, a dubbed body, a wing made from wood duck flank feathers, and a hackle from a rooster neck wound around the hook shank behind and in front of the wings. The size of the fly and color of the dubbing and hackle were varied to match all the various mayflies that served as significant food to the trout.

Another Side View

Another Side View

Sometime during this learning time period I purchased the book Hatches and read about the many types of mayflies and their unique characteristics and how to imitate them. The authors introduced a system of flies that they claimed could match most mayfly hatch matching situations, and they placed the prefix “compara” in front of their flies. For adult mayflies they offered a chart that consisted of four to six color combinations that could match a large percentage of the mayflies one might encounter. They also designed a style of fly that rode low in the surface film, and they claimed that this style presented a more precise silhouette of a mayfly dun particularly in smooth water. These flies were named comparaduns.

I quickly read all the chapters on the various mayflies that frequented the Northeast, but I continued to tie the Catskill style flies that required the purchase of expensive rooster necks with quality hackle feathers. I recall experimenting with a few comparaduns, but I didn’t like the appearance of my efforts using fairly undeveloped tying skills.

When I moved to Colorado I continued tying Catskill style dry flies; however, the variety of mayflies was much narrower in scope, so I didn’t need to tie nearly as many mayfly imitations as I did in Pennsylvania. In fact after hiring several guides I was introduced to nymphing with a strike indicator and began to experience a significant amount of success with this method. This also pushed me away from tying mayflies and fishing the surface.

Cinnamon Comparadun

Cinnamon Comparadun

Fairly soon after our move to Colorado I began attending the outdoor exposition that is held in Denver every winter, and on one of these visits I watched Marty Bartholomew demonstrate how to tie a comparadun. This lesson motivated me to tie a few so I could reinforce the tips and lessons learned. The two keys to making a good looking comparadun are splitting the tail fibers so that they serve as outriggers to support the hackle-less fly, and being able to splay the deer hair so that it forms a semi-circle around the hook shank. The bottom fibers of the deer hair also help to support the fly. My early efforts ignored these two basics, and I ended up with ugly flies that would not stand up, and the wing typically leaned forward unlike natural mayfly duns.

Marty showed me how to split the tails so they V’ed outward from the end of the abdomen, but his major contribution was advice on forming the wing. He suggested purchasing coastal deer hair as it is much finer and easier to work with particularly on small flies; but the significant tip was to stop the dubbing short of the wing, and this left a small gap. This allowed the wing to slant slightly backward once the tyer wrapped the dubbing tightly in front of the wing; and then after the wing was positioned, he took a wrap or two behind the wing to fill in the space beneath the wing. What a difference this made! My flies looked like real mayflies with the wing cocked slightly toward the rear, and they floated nearly as well as Catskill style flies. Best of all, I no longer needed expensive neck hackles to form a collar on my flies.

I now produced a nice batch of size 16 comparaduns, but I suspect they took up space in my fly box and were not utilized for a few years, until I encountered a strong pale morning dun hatch on the Colorado River. I tried some Catskill style PMD’s to no avail and in desperation reached in my box and extracted one of the size 16 light gray comparaduns. Much to my amazement this fly began to dupe brown trout like no other dry fly I had ever used. It didn’t take long before I became a disciple of the comparadun, and I began to tie them for pale morning duns, green drakes, and various eastern mayflies prior to infrequent return visits to Pennsylvania.

The final step in my comparadun evolution was the discovery of microfibbets. Microfibbets are synthetic fibers that take the place of hackle fibers. One buys them as bunches and they are dyed various colors, and they look like very fine monofilament or bristles from a synthetic paint brush. Microfibbets are much stiffer than hackle fibers and make even better outrigger tails for supporting comparaduns.

Good View of Split Microfibbet Tails

Good View of Split Microfibbet Tails

My supply of light gray comparaduns dwindled a bit over the last two summers, so I visited my fly tying desk and cranked out 28 new imitations over the last week or two. I tied them in sizes 14, 16 and 18 and made an equal number of light gray and cinnamon versions. During a visit to the Frying Pan River in September 2013 I discovered that the educated trout in that fabled river were selective to pale morning dun imitations with a cinnamon body, and the size of the late season PMD’s seemed to be on the small side, thus the size 18 flies.

There you have it. My evolution to a comparadun fan, and where I’m focusing my dry fly tying efforts in 2014.

Pool Toy – 02/14/2014

Pool Toy 02/14/2014 Photo Album

As I mentioned in my recent post on the Chernobyl Ant, I continually search for new hopper patterns that are more buoyant than a Letort hopper but also equally effective. So far I haven’t been very successful, but a guide I used in 2012 recommended a pool toy as the best hopper pattern. I tied some prior to the 2013 season and experimented with the resulting foam grasshoppers during the past season. Pool toys are definitely more buoyant, and I liked the ability to suspend large beadhead nymphs from these large foam creations. Pool toys are also highly visible due to the indicator and light color foam.

Top and Side

Top and Side

Unfortunately I’m not yet willing to say that pool toys catch as many fish as Letort hoppers. I probably didn’t fish a pool toy as much as I should have due to a lack of confidence in a new fly, and perhaps that explains the limited success. I can remember a few occasions when the size 10 yellow pool toy produced as well as a few cutbows gulping a pink version on the White River.

Pink Pool Toy

Pink Pool Toy

Because of the buoyancy and visibility, I decided to tie a few more pool toys in 2014 to add to my remaining collection from 2013. I made three tan pool toys and one pink. I’ve settled on barred sexilegs as the preferred material for appendages. I also used gray ice dub as the underbody as outlined in the material recipe from the originator, Andrew Grillos; whereas, I used a rabbit fur dubbing for the underbody on the versions I tied in 2013.

I will try to recommit to pool toys as my hopper imitation of choice in 2014. I will particularly try to test them in August and September, the prime grasshopper fishing months in Colorado.


South Platte River – 02/16/2014

Time: 11:30AM – 2:30PM

Location: Near Nighthawk and then in special regulation water below Oxbow Ranch

Fish Landed: 0

South Platte River 02/16/2014 Photo Album

What do you get when you combine a sixty degree day along the Front Range of Colorado with Sunday of Presidents’ Weekend and the South Platte River? You get a crowded stream with three or four cars in very pullout. That’s what I discovered today. Apparently a lot of fishermen had the same idea to find a cure for cabin fever.

I did some minor organization to make sure I restored all my gear after jumbling it a bit for my trip to Argentina, and then I packed a lunch and took off by around 10:30AM. I arrived at the first pullout after turning right at the bottom of Nighthawk hill and geared up for my first fishing outing of 2014. It felt rather warm but a stiff breeze kicked up periodically so I pulled my fleece over my fishing shirt and then rigged my Orvis four piece four weight rod and crossed the road to the river. It was probably around sixty degrees when I began; quite nice for the middle of February. There were three or four fishermen upstream and around the first bend and several fishermen at the next pool downstream, but I found some nice space across from the parking lot.

New Chernobyl Ant Tested

New Chernobyl Ant Tested

I elected to begin with one of the new fold-over Chernobyls that I tied recently and below that I added a salvation nymph. By the time I added tippet to my leader and tied on the two flies and began fishing it was around 11:30. I covered the water upstream for around forty yards, but didn’t see any fish. The next fisherman above me was blocking my path, but fortunately he grew weary of his position and exited by noon so I crossed to the north bank and began working the runs and pockets near the shore. The water was off color a tinge so I decided to insert a San Juan worm below the Chernobyl ant and then added the salvation nymph a foot or so below the worm.

South Platte River Near Nighthawk

South Platte River Near Nighthawk

I was now drifting my three flies in some nice runs and pockets with a water depth of three to four feet. The stretch I was approaching is one of my favorites and generally delivers a fish or two so I increased my focus. Sure enough as the Chernobyl drifted on the outside of a nice current seam, the foam fly paused and I set the hook and saw a twelve inch brown trout as I lifted it toward the surface. Alas, this would be my only opportunity for a fish on this early season venture, but the brown somehow shook free, and I was left with a limp line.

I moved upstream another 15 feet or so to an attractive area where I always spot a brown trout tight to an angled log, and sure enough I thought I spotted a fish next to the log and in front of a large submerged rock. I made four or five drifts over this spot, but on the next cast I misfired a bit too far and wrapped the nymph and worm around a willow branch. I needed to disturb the sweet run to retrieve my flies and sure enough a nice brown of 13 to 14 inches darted from the rocks as I waded through.

I continued a bit but quickly bumped into another fisherman deliberately nymphing the deep ledge rock hole so I waded back toward the road and returned to the car. There were a lot of fishermen in the area so I decided to move to the catch and release area five or six miles upstream. I loaded my gear in the RAV and surveyed the river for approximately eight miles until I passed Trumbull. There were three or four cars, if not more, in every pullout so I passed them up and made a U-turn and began retracing my path back toward Nighthawk. Part way between the bridge downstream from Oxbow Ranch and Scraggy View I noticed a large pullout on the left that only had one pick up truck, so I pulled in and prepared to resume fishing.

South Platte in Catch and Release Area

South Platte in Catch and Release Area

By 1:30PM the wind had become a serious issue. The water next to the parking lot was a wide shallow unattractive area with no cover for fish, so I waded upstream a bit to a place where I’d seen rising fish on previous visits, although the structure of the stream was only moderately improved. I tossed the Chernobyl plus San Juan worm plus salvation nymph for a bit but nothing was happening so I swapped the salvation nymph for a zebra midge as I noticed quite a few midges buzzing about in the air. I continued working my way upstream for another forty yards through some nice runs of moderate depth, but once again my flies were not attracting any interest. The gusting wind became unrelenting and the sun glare made it difficult to follow my fly, so at 2:30 I reeled up my flies and clipped them to the rod guide and called it a day. I was actually feeling quite chilled as I no longer wore my fleece, so this contributed to my decision to surrender on Sunday, February 16.

It was fun to get on the river in February, and my fold-over Chernobyl seems to be solid, although it still hasn’t faced the cycle of catching and releasing a fish. The crowds and wind however were more than I bargained for. I made a mental note to only fish the South Platte River during weekdays in the future.

Chernobyl Ant – 02/13/2014

Chernobyl Ant 02/13/2014 Photo Album

Prior to 2013 my workhorse flies and the first flies I would offer to fish as I began my day were a yellow Letort hopper trailing a beadhead hares ear nymph. These flies served me well; however, I became increasingly annoyed by the tendency of the yellow dubbed body of the Letort hopper to become saturated with water and sink. If the fish tuned into the surface fly I could tolerate frequently pressing the body against my shirt to absorb moisture and then a quick dunk in my dry shake canister.

I tried making alternative hoppers such as the Charlie boy hopper and the pool toy that employed a foam body and offered more buoyancy, but these flies did not catch fish at the same rate as the yellow Letort hopper. When I realized that the foam hoppers were not as effective as my trusty Letort hopper, I began to go to a Chernobyl ant more and more as my first fly of the day, and I quickly discovered that fish love Chernobyl ants. The black foam body floats much better than the Letort hopper and can easily suspend beadhead flies such as size 14 beadhead hares ear nymphs. A size 10 Chernobyl ant replaced the Letort hopper as my new number one visible attractor top fly on a dry/dropper arrangement. The beadhead hares ear remains as my number one subsurface option.

Given its status as my new number one, I decided to manufacture 15 new flies in preparation for 2014. As I began, I decided I wanted to improve the fly and eliminate the spinning problem that is endemic to my method of tying. Most Chernobyl patterns and tying instructions use two layers of foam with one on top of the hook shank and one below creating a hook sandwich. I like mine to have an iridescent body so I wind a pearl black chenille around the hook shank between the two tie down points and expose the underside of the top layer of foam. Unfortunately if the foam on top of the shank is too wide, I cannot obtain a solid tie down to the narrow hook shank. I improved the strength of the bond somewhat by wrapping dubbing over the thread at the tie down points to provide more bulk and friction for gripping. In addition I apply excess amounts of head cement to the tie downs and the head, but even with these improvements, a solid Chernobyl ant eventually spins after two or three catch and release cycles. It is very frustrating to hook an apparent decent fish only to lose it and discover that the hook twisted so that the hook point was pointing sideways instead of downward.

Old Style

Old Style

My friend Jeff visited last summer for some September fly fishing, and having read my rave reports about the Chernobyl ant, he decided to tie some in advance of his trip. I didn’t bias his tying with my methodology, and he invented his own unique method which included notching the foam at the tie down points. As I began to tie Chernobyl ants I planned to experiment with notching, but when I made my first prototype I discovered that the narrow V notch caused the rubber legs to flare out perpendicular to the foam as two tight parallel appendages. I didn’t like this look so I fired off a text message to my friend Jeff for advice on his methodology. In the process of exchanging text messages, Jeff mentioned that he tied the foam in at the bend and then bent it back over the top of the shank. This set off flashing lights in my brain as I guessed that a solid tie down of the foam at the hook bend would prevent the foam from spinning.

Foldover Style

Foldover Style

I immediately began a new fly and cut the end of my black foam strip to an arrow point and then attached it to the bend of the hook with quite a few solid wraps. I moved forward and created the dubbed bases for tie down along with the iridescent underbody with the pearl black chenille and then returned my thread to the rear tie down point. I folded the foam forward and snugged two or three strong wraps around the body creating a slight indentation. At this point I attached the rubber legs to the side of the foam as I had done previously and then moved on to the forward tie down point and added an indicator and front legs. I feel that this method of tying solves the spinning problem while maintaining the key triggering points of the original fly that has produced well for me.

Black Pearl Chenille Underside

Black Pearl Chenille Underside

A season of fishing will be the true test, and I can’t wait to get out on a stream to toss some new and improved Chernobyl ants.